

Got any toys left over from this year's Christmas crackers? Here's a way to actually use them - attach some rings and make a necklace! I enjoy novel pieces of jewellery, so hoarding the toys from our family's Christmas crackers seemed like a good idea (I'll let you be the judge). If you're interested in making this necklace or one like it, please read on! :)

Step one: supply gathering! You'll need a length of chain for your necklace, plus a clasp to join the ends together. You'll also need some joining rings - I think the split ones work well as they're relatively easy to thread onto things (the way a keyring 'threads' onto a key). You can get these things from any craft store. You'll also need your little plastic toys, cards, rings... or whatever it is you got in your crackers this year!

Spread out your chain to a length you'd like your necklace to be. I divided mine into two separate chain sections because I wanted to create a layered look. I let the bottom chain be slightly longer than the top one so that it would hang slightly lower on the finished product.

Next step! If you're using two chains like I did, then join your two pieces of chain at each end with a joining ring.
On one end, attach another link of your chain to the joining ring (see above picture).
On the other end, attach the necklace clasp to the joining ring.

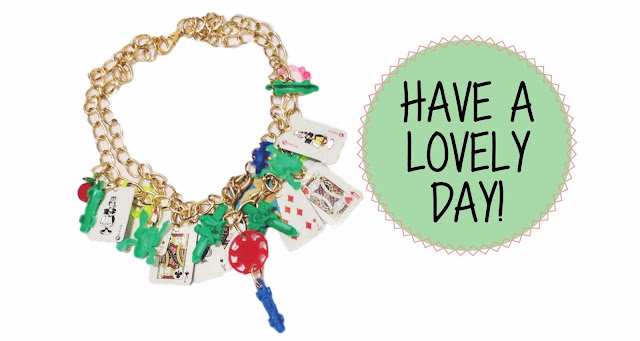
Okay! So now that your chains are joined, it's time to add your cracker things. A good way to start is by finding the middle ring of your length of chain and attaching a statement piece there (for me it was this neat little red spinning top).
From that point it's just a matter of working your way outwards on each side, like in the picture below.

Now just keep attaching your toys, in whatever fashion you choose! :)

As I was working I found I needed to punch holes into a couple of the plastic toys in order to insert a joining ring and then attach them to the necklace. You may find you also need to do this, in which case it's best to use a handheld sewing / leather hole punch.

There you have it! Once you've attached all your things, your necklace is ready! Yay!
Now not only do you have a cute, quirky and novel new necklace - but you'll also have a new kind of hope and excitement when you look at the little toys that come out of your crackers next Christmas :)
Let me know if you give this - or any of my DIYs - a try! Until then,


0 comments:
Post a Comment